Deploying the Site
User Guide → Deploying the SiteDeploying the Site
A site generated by MarkBind can be deployed by simply uploading the generated files to any Web server. In addition, MarkBind provides several convenient deployment options.
Generic steps for deploying a MarkBind site
- Set the
baseUrlproperty of thesite.jsonfile to match the deploy location. - (Optional) Use the
markbind servecommand to stage the site locally and confirm the contents are as expected. - Use the
markbind buildcommand to generate the site from source files. That command puts the generated site files in a directory named_site(you can change the output directory using parameters supplied to the command). - Upload the site files to the Web server. The sections below explain how to automate this step if you are deploying to some online platforms.
Steps for deploying multiple MarkBind sites:
- Create multiple
site.jsonfiles. Ensure that thebaseUrlproperty of eachsite.jsonfile matches its deploy location. - (Optional) Use the
markbind serve -s <file>command to stage each site locally and confirm the contents are as expected. - For each site:
- Use the
markbind build -s <file>command to generate the site from source files. - Upload the site files to the Web server. The sections below explain how to automate this step if you are deploying to some online platforms.
- Use the
Deploying to Github Pages
MarkBind can easily deploy a site to Github pages if the project root directory is also a GitHub repo.
Using the markbind deploy command
Running the markbind deploy command will deploy the most recent build of your site to the gh-pages branch of the repo origin and will be available.
Then, navigate to the Settings > Pages section on GitHub for that repository and set the source to the root of the gh-pages branch. You can read this source on Github Pages for more details.
Your site will be online at http://<username|org>.github.io/<repo> (e.g., http://se-edu.github.io/se-book).
If you are deploying the site to GitHub pages, the baseUrl setting in the site.json should be set to the "/<repositoryName>" for the links in the deployed site to work correctly.
Example If you are using Github Pages to host your deployed website at repo myorg/myproduct (i.e., the website is published at https://myorg.github.io/myproduct), then your baseUrl should be "/myproduct".
You can override the default deployment settings (e.g., repo/branch to deploy) in the site.json's deploy section:
markbind deploy does not generate the static site from your source; it simply deploys the files that are already in the _site directory. You need to run markbind build first if you want to generate the site before deploying.
Using CI Platforms
You can setup CI Platforms to automatically build and deploy your site on GitHub Pages every time your GitHub repo is updated.
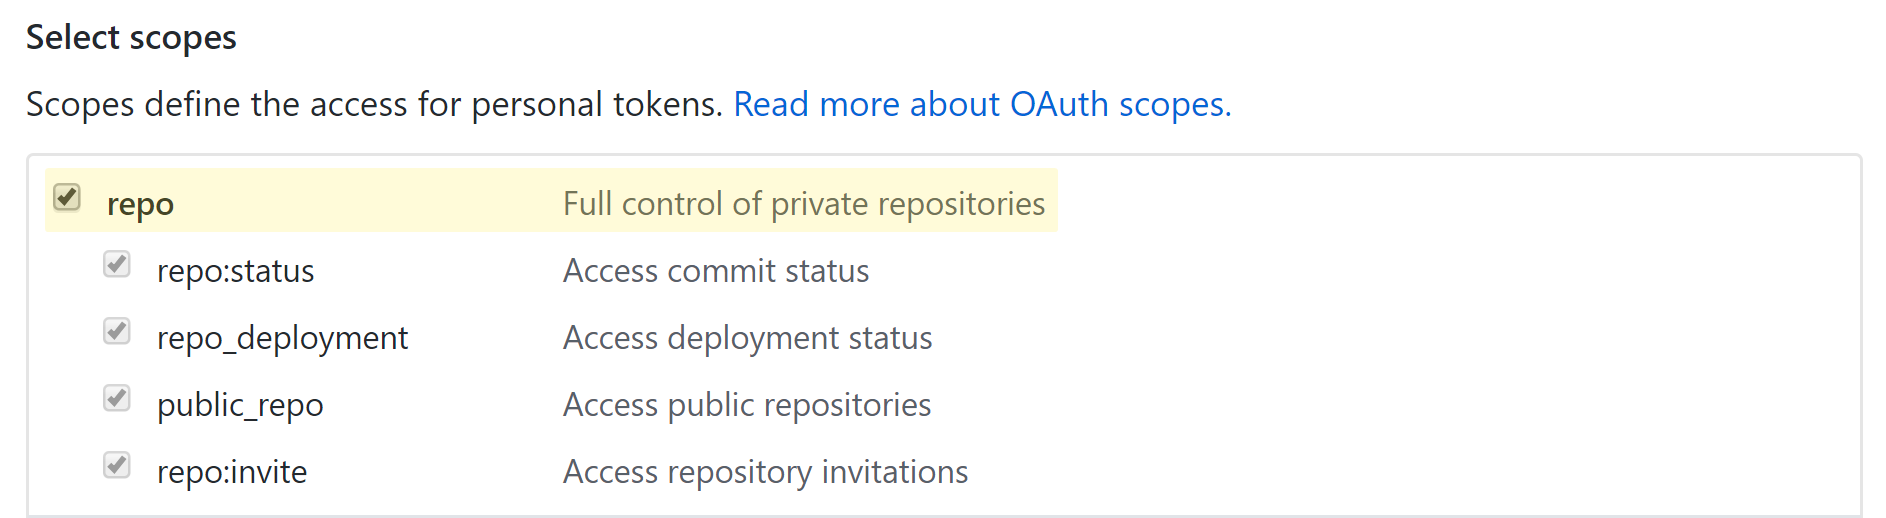
With the exception of Github Actions, a Github Personal Access Token with repo permissions is required for deploying your MarkBind site to Github Pages via CI tools.
You may refer to Github's documentation on how to generate a Github Personal Access Token. Ensure that you have enabled repo permissions as shown from the screenshot below.
Adding your repository to Travis CI
- Sign in to Travis using your GitHub account.
- Accept the authorisation for Travis CI when you are redirected to GitHub.
- Go to the Repositories page, and click on the green Activate button.
If you are already using Travis CI, click on the white Manage Repositories on GitHub button instead. - Select the repository with the MarkBind site, and add the Travis CI GitHub App to the repository by clicking the green Approve and Install button.
- Sign in to Travis using your GitHub account.
- Accept the authorisation for Travis CI when you are redirected to GitHub.
- Go to the Repositories page.
- Find the repository with the MarkBind site.
If the organization/repository is not shown in the list, click onReview and addlink at the bottom of the list of organization and follow the steps to give Travis access to the organization containing your repo. After that, come back to the Repositories page and use theSync Accountbutton to sync your Travis account with GitHub. - Activate the repo using the slider switch in front of it.

Configuring your repository in Travis CI
Add an environment variable in Travis CI named
GITHUB_TOKEN, with the value set to your generated Github Personal Access Token. Ensure that Display value in the build log is set to Off.
Add a
.travis.ymlfile to instruct Travis CI to build and deploy the site when you push to the repository. An example.travis.ymlfile that can accomplish this is given below:language: node_js node_js: - 10 install: - npm i -g markbind-cli script: markbind build deploy: provider: script script: markbind deploy --ci skip_cleanup: true on: branch: master
More information about .travis.yml can be found in the Travis CI documentation.
- Commit
.travis.ymlto your MarkBind repository and push the changes. Travis CI should begin to build your site. - Select the MarkBind repository on Travis CI and check the build status to see if it is successful.
- Once the build succeeds, your MarkBind site should be online at
http://<username|org>.github.io/<repo>e.g., http://se-edu.github.io/se-book. Travis CI will automatically build and deploy changes to your site as you push new changes to the repository after a few seconds.
You might have to go to theSettingsof your repo and configure it to publish GitHub Pages from thegh-pagesbranch as MarkBind deploys to that branch by default.
Configuring Travis CI to only deploy from a specific repository
When Travis CI is set up as explained above, Travis CI will attempt to deploy the site from any repository it is in, including forks.
If you want Travis CI to only deploy from a specific repository (eg. only from your main site repository), you can add to the deploy phase a repo condition in the form owner_name/repo_name.
For example, if you only want Travis CI to deploy the site when it is run from the se-edu/se-book repository, the following repo condition should be added to .travis.yml.
  on:
    branch: master
    repo: se-edu/se-book
The repo value can be changed to your specific repository as desired.
Adding your repository to AppVeyor CI
Sign in to AppVeyor CI using your Github Account.
Authorize AppVeyor App as Github App in the account settings by clicking on the Install AppVeyor App button.

In the projects directory, click on the New Project button.

Finally, select the repository containing your MarkBind site.
Configuring your repository in AppVeyor CI
Ensure that you have generated a Github Personal Access token with repo permissions.
Navigate to the project settings page of your repository in AppVeyor CI.
On the left menu, click on Environment.
Under the heading Environment variables, add a custom environment variable named
GITHUB_TOKEN, with the value set to the personal access token that was generated in the first step. Ensure that you toggle variable encryption by clicking on the padlock.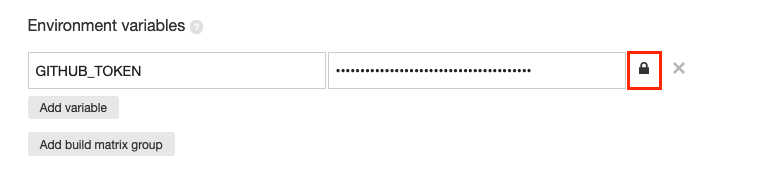
Remember to click Save at the bottom of the page.
Add a
appveyor.ymlfile at the root of your MarkBind site's repository to instruct AppVeyor CI to build and deploy the site to Github Pages when you push to your repository. More information on customizingappveyor.ymlcan be found in AppVeyor documentation. An exampleappveyor.ymlfile is given below:environment: nodejs_version: '10' branches: only: - master install: - ps: Install-Product node $env:nodejs_version - npm i -g markbind-cli - markbind build - markbind deploy --ci test: off build: off
Commit and push appveyor.yml to your github repository. Thereafter, AppVeyor CI should begin to run the build script. You are able to view the current build status by clicking on your repository in the AppVeyor projects page. Once the build succeeds, you should be able to view your MarkBind site, after a few seconds, at http://<username|org>.github.io/<repo> e.g., http://se-edu.github.io/se-book.
Adding your repository to Circle CI
Ensure that you have generated a Github Personal Access Token with repo permissions.
Sign in to Circle CI using your Github account.
In the projects dashboard, click on the
Set Up Projectbutton beside the repo containing your MarkBind site.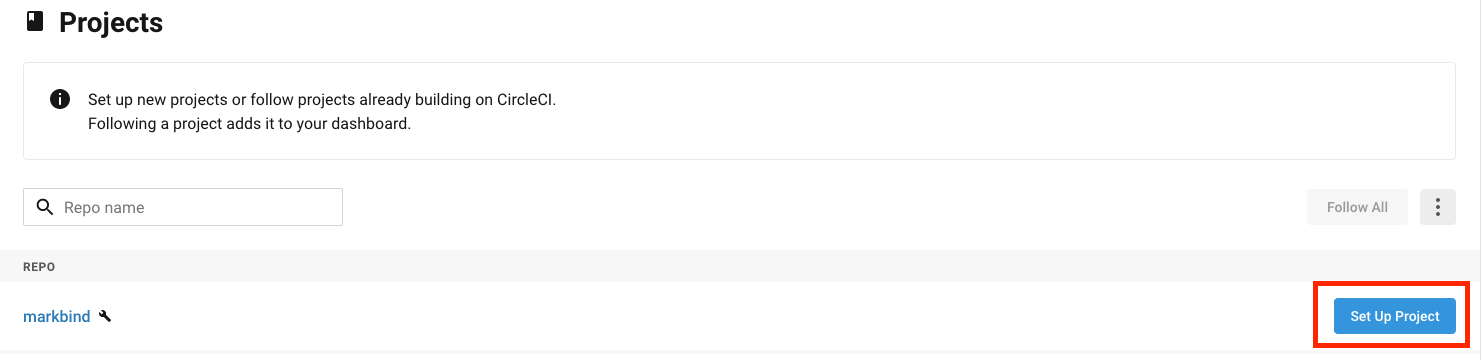
Configuring your repository in Circle CI
Once you have set up your project, click on the
Project Settingsbutton.On the left, click on the
Environment Variablestab and add a custom Environment Variable,GITHUB_TOKEN, which contains the value of your Github Personal Access Token.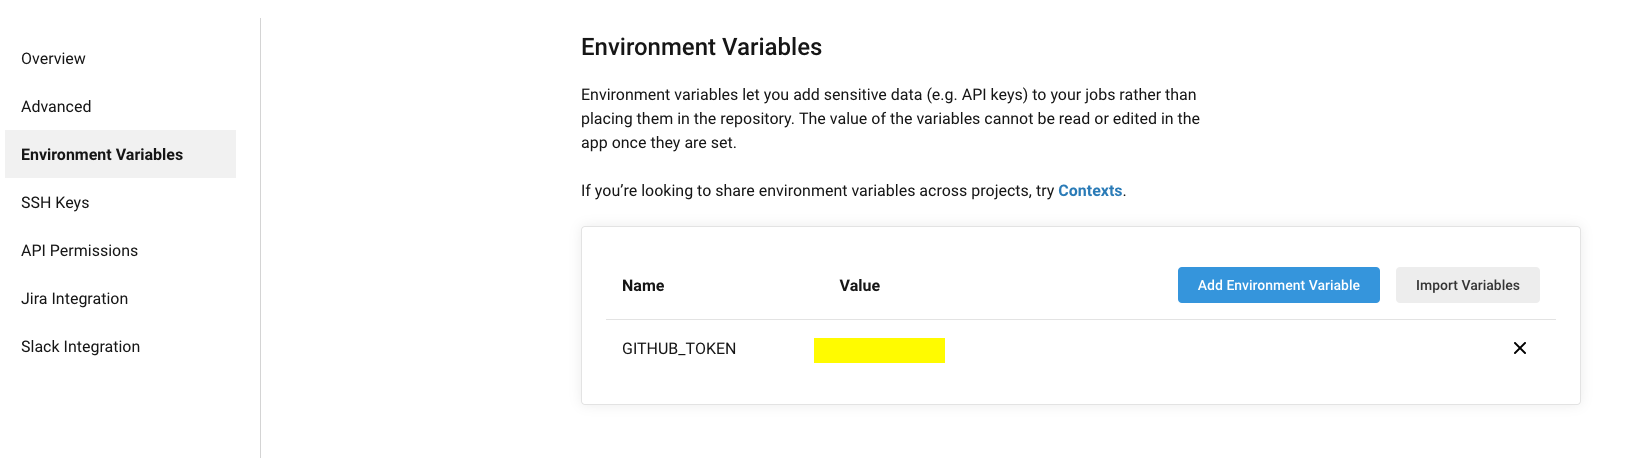
Commit and push a
config.ymlfile to the repo containing your MarkBind Site that instructs Circle CI to build and deploy your MarkBind site to Github Pages whenever you push to your repository. Ensure that theconfig.ymlfile is located in the<PROJECT_ROOT>/.circleci/directory. A sampleconfig.ymlfile is shown below:jobs: Build-And-Deploy: docker: - image: 'cimg/base:stable' steps: - checkout - node/install: node-version: "10" npm-version: "6" install-yarn: false - run: node --version - run: npm i -g markbind-cli - run: markbind build - run: markbind deploy --ci version: 2.1 orbs: node: circleci/node@4.1.0 workflows: Deploy-MarkBind-Site: jobs: - Build-And-Deploy
After you have pushed the config.yml file to your remote repo, you should see Circle CI starting to run the Deploy job in your projects dashboard. Once it is successful, you should be able to view your MarkBind site at http://<username|org>.github.io/<repo>.
For more information on customizing your build script, you may refer to Circle CI Config Reference Document.
Deploying to Netlify
You can setup to automatically build and deploy your site on their platform every time your GitHub repo is updated.
Here are the steps to set up Netlify:
Go to https://app.netlify.com/ and sign up
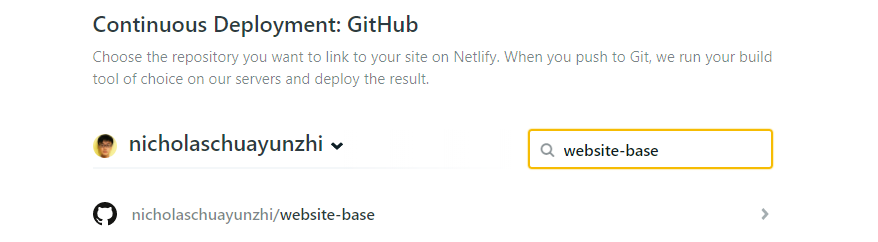
Next go to https://app.netlify.com/account/sites and select
New site from GitSelect your git provider

Select your MarkBind site repository
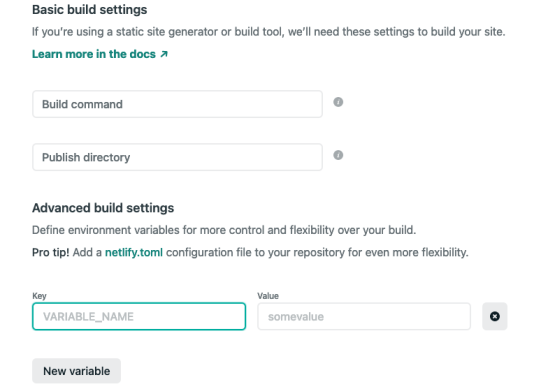
Update the build settings as follows and hit
Deploy site:Build Command:npm i markbind-cli -g && markbind build --baseUrlPublish directory:_siteShow advanced: Add a new variable with the key asNODE_VERSIONand the value as12or higher
Now your site will be deployed on Netlify at the given address specified after deployment. It will be updated automatically when the default branch of your repo is updated.
Previewing Pull Requests for MarkBind sites
If you are hosting your MarkBind project on Github, you can setup in order to automatically build and deploy the modified MarkBind site based on the changes in the PR.
Previewing PRs using Netlify
By following the steps to deploy to Netlify in the previous section, you would automatically be able to preview PRs.
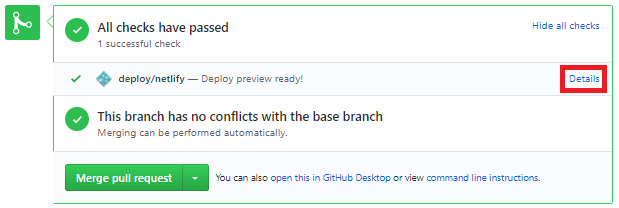
You can preview the updated site at the bottom of the pull request by clicking on details link in the PR:
For more information on previewing PRs with Netlify, you may refer to Netlify's docs.
Previewing PRs using Surge
You may also preview PRs using Surge, which is an NPM package that does static web publishing. Here are the steps to do so:
First install Surge using by typing
npm install --global surgeon your terminal.Next, type
surgein the terminal. You should see the following prompt:
Proceed to create a Surge account. After you have set up your account, you should see the following screen:

Hit
CTRL-Con your keyboard to quit the current running Surge process.The rest of the Surge setup is unnecessary for the purposes of setting up PR previews. You may still proceed with the rest of the setup such as setting the project directory and the domain name, if you wish to.
Next, type
surge tokento generate your surge token.
In the repo of your MarkBind site, create a new secret by going to "Settings"->"Secrets" and naming it as
SURGE_TOKENand setting its value to the value of the generated surge token.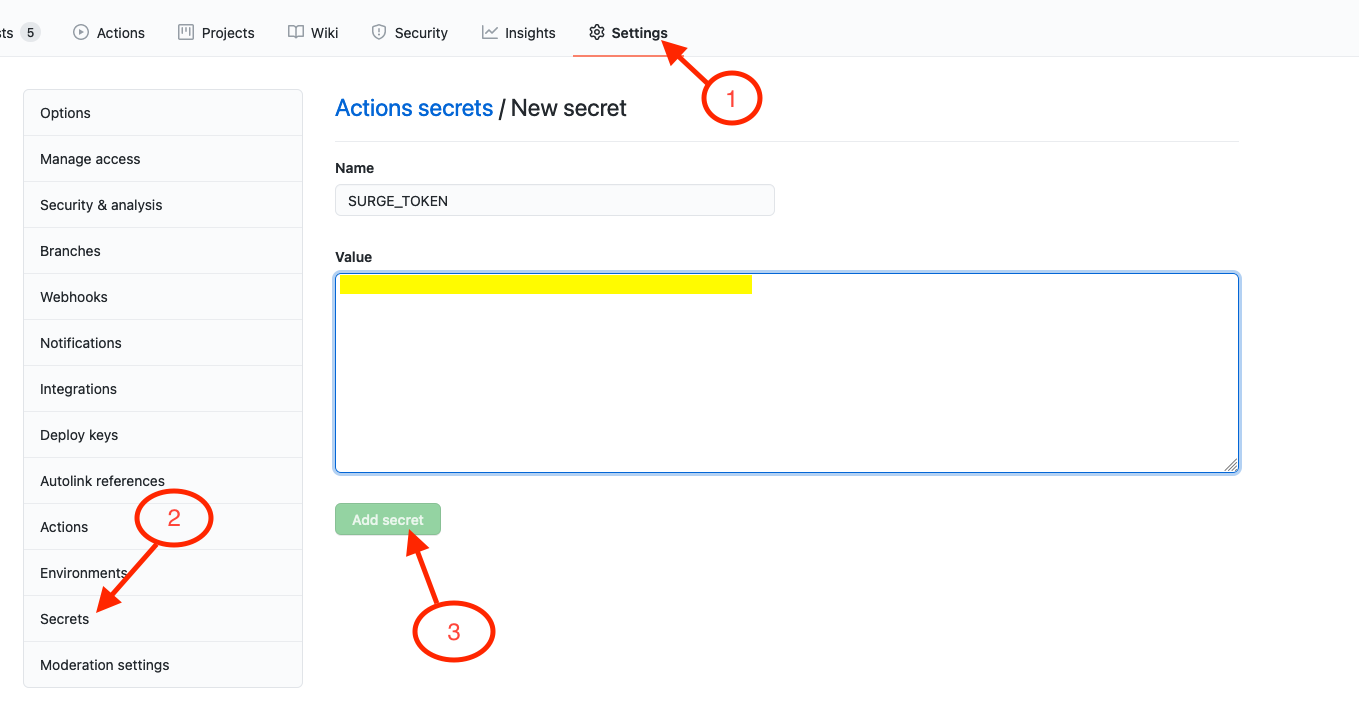
Commit and push the following 2 files into your markbind site repo, in the directory
<PROJECT_ROOT>/.github/workflows/.
Finally, you may open a PR to the repo of your MarkBind site. If everything is configured correctly, after a few minutes, you should be able to see a github-actions bot automatically commenting on the PR with a link to preview the updated MarkBind site.

For more information on Surge, you may refer to Surge's docs.