Using Plugins
User Guide → Using PluginsUsing Plugins
A plugin is an extension that adds additional features to MarkBind. Some non-essential MarkBind functionalities are provided as plugins so that you can enable/disable/configure them as necessary. MarkBind also supports adding external plugins (written by you or other third parties).
MarkBind's philosophy is to bake-in all necessary functionality into MarkBind itself rather than expect users to go hunting for suitable plugins. Hence, we do not anticipate MarkBind users to rely heavily on such external plugins.
Managing Plugins
Plugins are managed via the following two properties in the site.json.
plugins: An array of plugin names to use.pluginsContext: Parameters passed to each plugin, specified as key-value pairs.
For example:
{
  ...
  "plugins": [
    "plugin1",
    "plugin2",
  ],
  "pluginsContext": {
    "plugin1": {
      "input": "Input for Plugin 1"
    },
    "plugin2": {
      "data": "Data for Plugin 2"
    }
  }
}
Using Built-in Plugins
MarkBind has a set of built-in plugins that can be used immediately without installation.
Plugin: Algolia
This plugin allows you to use Algolia DocSearch for your site.
To enable it, add algolia to your site's plugins, and supply the required options via the pluginsContext.
| Name | Type | Default | Description |
|---|---|---|---|
| apiKey | String | The API key for your site's Algolia DocSearch setup | |
| appId | String | The application id for your site's Algolia DocSearch setup | |
| indexName | String | The index name for your site's Algolia DocSearch setup | |
| searchParameters | Object | {} | A JSON object specifying the Algolia Search Parameters |
{
  ...
  "plugins": [
    "algolia"
  ],
  "pluginsContext": {
    "algolia": {
      "apiKey": "25626fae796133dc1e734c6bcaaeac3c", // replace with your site's api key
      "appId": "R2IYF7ETH7", // replace with your site's application id
      "indexName": "docsearch", // replace with your site's index name
      "searchParameters": { "facetFilters": ["site:yoursite.com"] } // optional
    }
  }
}
To connect the searchbar component to Algolia DocSearch, add the algolia key.
<searchbar placeholder="Search" algolia menu-align-right></searchbar>
Alternatively, if you are using a custom search bar, you can assign the input field the id algolia-search-input to connect it to Algolia DocSearch.
<input id="algolia-search-input">
By default, Algolia DocSearch indexes all content on the page, including content in components that are hidden to the user during the initial render (e.g. Panels). To exclude these content from being indexed, you can add .algolia-no-index to the selectors_exclude attribute in your DocSearch configuration.
The algolia-no-index class is automatically added to content hidden by MarkBind's Vue components. You may also add the algolia-no-index class to content that you do not want to be indexed by Algolia DocSearch.
Plugin: codeBlockCopyButtons
This plugin adds a copy button to fenced code blocks so that readers can copy the code easily.
To enable it, simply add codeBlockCopyButtons to your site's plugins.
{
  ...
  "plugins": [
    "codeBlockCopyButtons"
  ],
}
This is what it'll look like once added:

Plugin: codeBlockWrapButtons
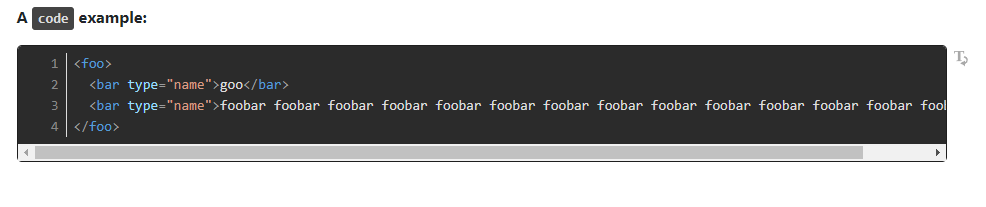
This plugin adds a wrap text button to fenced code blocks so that readers can read long lines of code without scrolling sideways.
To enable it, simply add codeBlockWrapButtons to your site's plugins.
{
  ...
  "plugins": [
    "codeBlockWrapButtons"
  ],
}
This is what it'll look like once added:
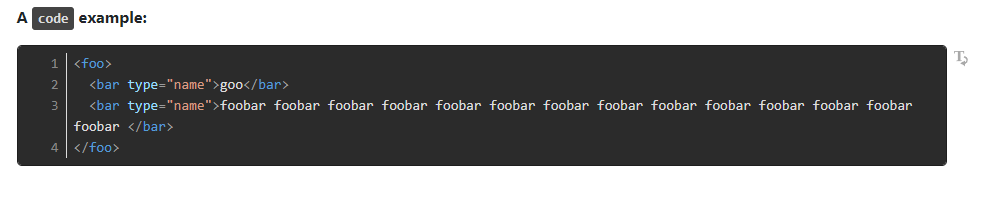
Clicking the wrap text button will result in the following:
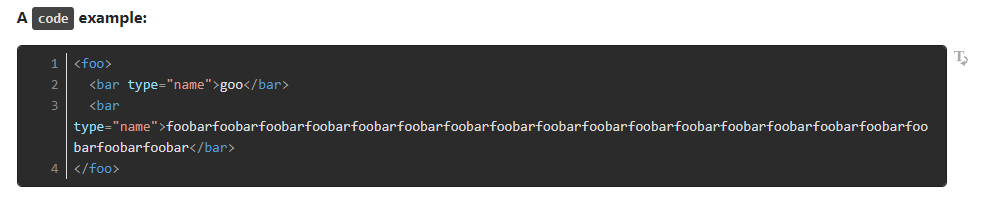
In case a single long word is encountered, it will be split across multiple lines similar to the following:
Plugin: Tags
With this plugin you can use tags to selectively filter content when building a site.
Toggling alternative contents
Tags are specified by the tags attribute, and can be attached to any HTML element. During rendering, only elements that match tags specified in the site.json files will be rendered.
Example Attaching tags to elements:
# Print 'Hello world'

<p tags="language--java">System.out.println("Hello world");</p>
<p tags="language--C#">Console.WriteLine("Hello world");</p>
<p tags="language--python">print("Hello world")</p>
You need to specify the tags to include in the pluginsContext, under tags:
{
  ...
  "plugins" : [
    "filterTags"
  ],
  "pluginsContext" : {
    "filterTags" : {
      "tags": ["language--java"]
    }
  }
}
All other tagged elements will be filtered out. In this case, only the element with the language--java tag will be rendered. This is helpful when creating multiple versions of a page without having to maintain separate copies.
If the filterTags plugin is not enabled in site.json, all tagged elements will be rendered.
You can also use multiple tags in a single HTML element. Specify each tag in the tags attribute separated by a space. An element will be rendered if any of the tags matches the one in site.json.
Example Attaching multiple tags to an element:
# For loops

<p tags="language--java language--C#">for (int i = 0; i < 5; i++) { ... }</p>
As long as the language--java or language--C# tag is specified, the code snippet will be rendered.
Alternatively, you can specify tags to render for a page in the front matter.
Example Specifying tags in front matter:
<frontmatter>
  title: "Hello World"
  tags: ["language--java"]
</frontmatter>
<p tags="language--java advanced">System.out.println("Hello world");</p>
<p tags="language--C# basic">Console.WriteLine("Hello world");</p>
<frontmatter>
  title: "Hello World"
  tags: ["language--java"]
</frontmatter>
Tags in site.json will be merged with the ones in the front matter, and are processed after front matter tags. See Hiding Tags for more information.
Advanced Tagging Tips
You can use a * in a tag name to match elements more generally. A * in a tag will match any number of characters at its position.
Example Using general tags:
<frontmatter>
  title: "Hello World"
  tags: ["language--*"]
</frontmatter>

<p tags="language--java">System.out.println("Hello world");</p>
<p tags="language--C#">Console.WriteLine("Hello world");</p>
<p tags="language--python">print("Hello world")</p>
All 3 <p>s will be shown.
Hiding Tags
Using - at the start of a tag hides all tags matching the expression. This is helpful for disabling a group of tags and enabling a particular tag.
Example Using general tags:
<frontmatter>
  title: "Hello World"
  tags: ["language--java"]
</frontmatter>

<p tags="language--java">System.out.println("Hello world");</p>
<p tags="language--C#">Console.WriteLine("Hello world");</p>
<p tags="language--python">print("Hello world")</p>
{
  ...
  "plugins" : [
    "filterTags"
  ],
  "pluginsContext" : {
    "filterTags" : {
      "tags": ["-language--*", "language--C#"]
    }
  }
}
language--java is overridden by -language--*, so only language--C# is shown.
This only works because tags are processed left to right, so all language--* tags are hidden before language--C#. Tags in site.json are processed after tags in <frontmatter>.
# Print 'Hello world'

<p tags="language--java">System.out.println("Hello world");</p>
<p tags="language--C#">Console.WriteLine("Hello world");</p>
<p tags="language--python">print("Hello world")</p>
{
  ...
  "plugins" : [
    "filterTags"
  ],
  "pluginsContext" : {
    "filterTags" : {
      "tags": ["language--java"]
    }
  }
}
Plugin: GoogleAnalytics
This plugin allows your web pages to be captured by google analytics.
To enable it, add googleAnalytics to your site's plugins, and add the trackingID parameter via the pluginsContext.
| Name | Type | Default | Description |
|---|---|---|---|
| trackingID | String | Tracking ID provided by Google. Follow this guide to get your Tracking ID. |
{
  ...
  "plugins": [
    "googleAnalytics"
  ],
  "pluginsContext": {
    "googleAnalytics": {
      "trackingID": "YOUR-TRACKING-ID", // replace with your google analytics tracking id.
    }
  }
}
Plugin: Disqus
This plugin allows you to use Disqus for your site.
Before you can use this plugin, you need to (1) setup a Disqus account and (2) register your site.
You may sign up for a Disqus account and register your site here.
Note that you do not have to install Disqus on your site, this plugin does it for you.
All you have to do is provide the shortname of your Disqus site, which is explained below.
To enable this plugin, add disqus to your site's plugins, and supply the required options via the pluginsContext.
| Name | Type | Default | Description |
|---|---|---|---|
| shortname | String | Shortname is provided by Disqus. Follow this guide to get shortname for your Disqus site. |
{
  ...
  "plugins": [
    "disqus"
  ],
  "pluginsContext": {
    "disqus": {
      "shortname": "YOUR_DISQUS_SITE_SHORTNAME", // replace with your Disqus site's shortname
    }
  }
}
Then, to add a Disqus comment section on a page, all you need to do is to add a <disqus/> HTML tag to any MarkBind source file.
It may be a good idea to create a layout with <disqus/> in it, so that you won't have to repeat it on every page.
Plugin: TexWithDollars
This plugin allows you to use as the delimiter for your math formulae.
Insert inline equations by enclosing them in single dollars
$...$.Insert display equations by enclosing them in double dollars
$$...$$.Insert numbered display equations by enclosing the equation in double dollars and the equation number in round brackets
$$...$$ (1).
Note that the default delimiters still function as expected, this plugin simply adds an additional delimiter.
To enable this plugin, add texWithDollars to your site's plugins.
{
  ...
  "plugins": [
    "texWithDollars"
  ]
}
Example Example:
$2_3$

$$
\frac{1}{2}
$$
The above will be rendered as:
Using External Plugins
Adding External Plugins
WARNING: Plugins are executable programs that can be written by anyone. This means that they might contain malicious code that may damage your computer.
Only run plugins from sources that you trust. Do not run the plugin if the source/origin of the plugin cannot be ascertained.
Plugins come as .js files. To install an external plugin, simply put it in the _markbind/plugins folder. To use the plugin, update the site.json file the same way you did for built-in plugins.
Writing Plugins
You may also write your own plugins! Refer here for the available interfaces to do so.